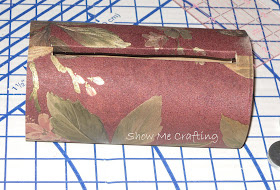
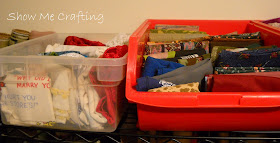
Here are my "after" pictures. I recently read a post by Tiffany at Making the World Cuter, and she said you should start with the best pictures on a blog post. And since I'm still learning, I'll take free advice, especially from seasoned bloggers.
So let's start back at the beginning. This is what my ribbon
Remember that roll of wallpaper that I scored from my mother-in-law's basement? I've already used it to make beads, sewing pattern envelopes, and covered a box to store my patterns in. We can now add ribbon organization to the many uses of the roll of paper. I started out with Oatmeal containers.
I had one scrap left from one of the other projects that was large enough for one of the small containers.
I marked out what I needed and cut the paper for covering with a glue stick. (I had previously figured out that school glue didn't stick to this textured wallpaper.)
I knew I wanted a slot in the oats container so I measured and marked it out down one side.
I don't have an X-acto knife. I'm really clumsy and think it would only be a matter of time before I lopped off something unintentional... not to mention painful and messy, so I opted for a serrated steak knife. To aid in cutting the slot I used my trusty sewing awl, (still haven't found a use for it in sewing!), to punch some holes along the cutting lines to serve as a sort of perforation. If you're brave enough to use an X-acto knife you could probably skip this step.
With the opening cut down the side of the container, it was time to get the paper ready for gluing. I made two cuts so the part that would have been over the slot would fold to the inside.
Changing the subject.. have you made pattern weights? Mine are three washers glued together with E-6000 glue. They are the best thing ever!!! I use mine all the time!
So here's the first one all glued down and clamped till the glue takes hold.
I have a much longer tab here than I had on the last one. I also curled those center tabs the opposite direction from the way they wanted to go, so once inside they would follow the interior curve of the container.
Here's one all glued, set, and filled with ribbon spools.
Here's the final product. I can see all of my ribbons at a glance without digging through that messy pile. Much Better!
On to the fabric!
We drink a LOT of Diet Coke, so I cut apart 12 can cartons to make bolts to wrap the folded fabric around. I cut tall ones (14") for the back of the shelf and shorter ones (8") for the short stacks in front.
I used that system for the top two shelves. The very top of the rack holds shallow tubs for smaller pieces of fabric, fat quarters and the like.
The bottom shelf has some larger pieces that didn't lend themselves to the bolt system, like vintage drapery panels.
I have one shelf finished. I'm still working on the other. Once I get them both done I'll probably do some color groupings, but for now, I'm just trying to get everything bolted and in place on the shelves.
What organization challenges have you conquered with your craft supplies? I'd love to hear about it!
Thanks for stopping by :)


What great ideas!!! i love how it looks all organized :-).
ReplyDeletethanks so much dear Tammy for visiting my blog and for your lovely comment on my poster diy. got me to visit you. i like it here and am following you now with linky. would be honored if you would like to follow back, but no hard feelings if not.
have a lovely sunday
jutta
This is so smart!!! I totally need tips on organizing my craft and sewing items...I just inherited a bunch of my grandmother's sewing supplies - she was a professional dress maker - and now I need to get to work organizing it so I can put it to use :) Thanks for the inspiration!
ReplyDeleteTammy this is a really clever idea. Thanks for sharing with the newbie party.Enjoy!
ReplyDeletewow great ideas. Hopping over from the newbie party XO
ReplyDeleteWhat a great way to organize ribbon - I've pinned it to my Sew Organized Board! Thanks for sharing your tricks!
ReplyDeleteMy way is much like your before. Now I just need to get some comtainers so I can fix mine up. Auto meets agriculture to replace plastics
ReplyDeleteThat is absolutely a brilliant idea for organizing ribbon! You should see my mess! I would love for you to link up to “It’s a Party” going on right now!
ReplyDeletewww.acreativeprincess.blogspot.com