Showing posts with label Tutorial. Show all posts

Sunday, January 6, 2013

Scissor & Craft Tool Caddy


So here's the dilemma - I have these scissors lots of scissors! Sewing, non-fabric, pinking shears, scrapbooking... And then there's the tools, pliers, wire cutters, wire curlers, a pattern notch cutter... You have that same dilemma too, right?
I needed something to keep them in that was portable, so if I was hand sewing or beading at my work table I could just place them there with me, and yet keep them organized and out of the way when I wasn't using them. So here's what I came up with.


A vast improvement from what I started with.


I know... Crazy!, right?

I started with my scissor assortment, laying out the various sizes. My sewing scissors were the longest. The scrapbooking scissors are shorter, but thicker. 


I made sure the box I selected was taller than my longest pair.


Then decided on the size of the hold that needed, so I measured them at the base of the handle. Then measured out a piece of paper the size of the box.


I drew out a grid of one inch squares on the template, cut paper scraps roughly the size of the holes and placed them on the template to decide on the placement of the holes.


After cutting the holes in the template I used it to transfer the placement to the box itself, and using a craft knife I cut the holes.

As I cut the holes I decided I wanted to reinforce it, so I used my template to cut a piece of corrugated plastic that I had the same size as the box. (That stuff's great for purse bottoms too. Collect them after the election, they're abundant and best of all, FREE!)


I cut the corrugated plastic large enough that it fit snugly inside the box, then cut the holes in it using the craft knife.
                   
I tested the caddy before I started covering it just to make sure it would work as I had envisioned, (not all of my bright ideas do!).


I selected the fabric that I wanted to cover it with, measured it out big enough to cover the top and sides. I sewed a zigzag stitch around the edge, then turned it up sewed in a casing.

 I used a thin cord that had as a draw string, put the box in it and pulled it tight to gather the fabric up around what would be the bottom of the caddy.
                                           

Now, how to get the holes in the fabric? I couldn't just simply cut the fabric. I considered doing that and using some Stop Fray on it to prevent unraveling, but decided a better solution would be to sew a button hole at each spot. To do that, I placed the template on the top of the box with the fabric in place and hand sewed an X at each spot with contrasting thread.


Once the buttonholes were in and clipped. I permanently tied off the draw string on the bottom. I removed the contrasting thread X's, what I could anyway, you can see small pieces of it were left behind. I probably should have used all white, as the remnants of wouldn't be so noticeable.

 I also added some scalloped ribbon trim to dress it up. (I just whip stitched it in place.)  It holds all of my scissors, craft tools and even my magnifying glass.
 I can just move the whole thing to my work table so if I'm beading or whatever I'm working on I have whatever tool I need at my finger tips without searching around or digging through a pile. 

It freed up space on my little tray. So I could better organize it too. I had this cute vintage green container that held the monster buttonhole attachment to my Grandmother's old Singer. I decided it was the perfect little storage container  for my sewing room. I removed the attachment that it held and filled it with marking pens, awl, screw driver, my measuring stick and other implements of construction. 


What organizing problems have you tackled? I'd love to hear your ideas and solutions.

Thanks for stopping by! :) 

Linking up at Debbie-Doos and other fun parties listed on my Link Party page. Come by and join in!

Friday, December 21, 2012

Beaded Stilettos


Do you know SkyMall? It's a catalog that's found on airplanes. I remember a comedian once saying the catalogs were full of things you never knew you needed until you saw them there. In some ways Pinterest is like that for me. Take stilettos for instance.. The only stilettos I knew about before Pinterest had to do with shoes. 

Did you know these are stilettos too?
I didn't. I saw them at Pinterest and immediately repinned them onto my Tutorials board. These are the lovelies that I discovered there.
This set was made by the Empress of the Universe over at her blog, (what a cool blog name.. I'm totally jealous!). When I saw them at Pinterest the pretty beads caught my eye so I clicked through and read about them. 
They're handy little tools that can be used in a lot of areas of crafting and sewing. From guiding fabric near the presser foot on the machine, to turning narrow hems up at the iron, and even something to manipulate objects around wet glue or paint. 

I looked for the turkey lacers for awhile after discovering the stilettos at Pinterest, but didn't find them anywhere. Then, a couple of weeks ago I ran into Bed Bath & Beyond and remembered that was where the Empress mentioned finding hers.

I found the same ones she did. They were $.99.. A craft project for a buck! (That's Mr. ShowMe's favorite kind! heheh) 
 I bent the angled ends into loops with my jewelry making tools.

 Then went through my bead stash and pulled out beads with holes big enough for the lacers. 


 What a great way to use up some of those pretty onsies lampwork glass beads! It was so much fun trying the different beads on the lacers and figuring out which ones went together! Once I got that part worked out I decided on which glue to use.  


Then put a bit of glue between the bottom two beads and at the bottom of the last one. 
I took the Empress' tip and clamped the looped ends in clothes pins and set them up like that to dry overnight.

And voila!

I named them from left to right, Her Majesty, Heavy Metal, Circus Circus, He Loves Me, Woody, and She Swims With The Fishes. They were a blast to make and I've already used them countless times. Oh yeah, and I found the perfect place to store them... this little Florida souvenir toothpick holder that I picked up at the flea market for $1.
Has Pinterest helped you discovered something that you never knew you needed and then just couldn't do without?

I'd love to hear about it!

Thanks for stopping by :) 

Sunday, December 9, 2012

Christmas Sleighs

I've been blog absent for a long time. Between working 60-70 hours a week and getting ready for Christmas, it hasn't left much time for anything else. Even though I haven't been able to post anything, I haven't completely forgotten about my blog. I've been taking pictures and have lots of blog posts to put up. I wanted to get this one up, in case it might inspire some of you to do something similar while you still have time. I made something like these years ago, but this time I decided to challenge myself to see if I could do it on the cheap with all of my components coming from thrift and dollar stores. 

I completed the challenge by creating two fun and festive center pieces at a fraction of the cost from my previous versions.


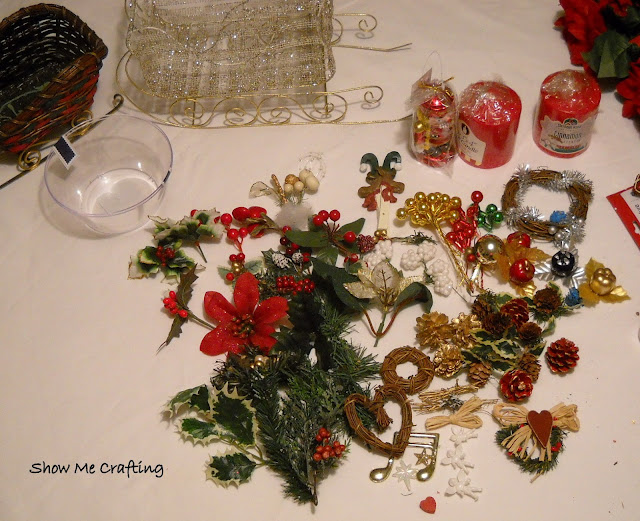
I started in early November watching the thrift stores for just the right sleigh basket. The ones I made in the past were wicker. I found this wire one at a Goodwill and paid a little more than I wanted, $3, but I had been looking for sometime and it was the right size at 15" long and in good condition, so I went ahead and bought it. I found a smaller wicker and metal version at a much better price since it was in my Mother-in-Law's basement making it free. (Yay Free!!)
While I was watching the thrift stores for sleigh baskets, I was buying up festive bobbles, picks, sprigs and candles. I actually found one big bag of misc stuff for $1.40 at one shop.
At another I found a bag with two short pillars and a nutcracker candle still wrapped in cellophane, never used, for $2.00.


I hit the Dollar Tree for the clear plastic bowl that I needed for the wire sleigh and a bag of Potpourri so they would smell AND look pretty.
With all of the components finally gathered I spread them all out on my work surface and started putting them together. I started with the wire one, since it was bigger. I knew I wanted the silk flowers standing up in the back, so I cut a piece of the floral foam that I had to the right size and wrapped it in aluminum foil since it would show through the sides. With the poinsettias inserted in the back piece of foam I added the bowl to the body of the sleigh, wrapped another piece of foam in foil and inserted cinnamon sticks at the four corners. I poured the potpourri into the bowl around the block of foam and placed one of the pillar candles on top of that foam piece.


Then I filled it in with some of the little sprigs and sprays that came from that mixed bag that I bought at the one thrift store. I added straight pins and secured them into the foam under the candle where I needed.
Of course the candles not for burning, but it adds a pretty festive touch, don't you think?


For the smaller sleigh I decided my nutcracker candle should be the driver so I positioned the remaining piece of floral foam in the basket, carved out a small section for him to rest in and set pins around the parameter to so he wouldn't topple out too easy. I poured the rest of the potpourri around the foam and added more sprigs and sprays to fill in. I decided it needed some height so I added the golden berries at the back.


I have about $5.00 cost in each which is pretty cheap for large, floral, fragrant centerpieces. They were really fun to do and came together really fast. And I must admit, the best part was in the hunt for all the pieces in the thrift stores! I'll have to keep my eyes open for another sleigh. I think I have enough of the decorative bits for one more. Potpourri and flower foam is easy enough to come by if I find the right vessel to make one more.

Thanks for stopping by!

I'm linking up at Debbiedoo's  , Home Stories AtoZ and other fun parties listed on my Link Party page. See you there!