Showing posts with label fabric. Show all posts

Sunday, January 6, 2013

Scissor & Craft Tool Caddy


So here's the dilemma - I have these scissors lots of scissors! Sewing, non-fabric, pinking shears, scrapbooking... And then there's the tools, pliers, wire cutters, wire curlers, a pattern notch cutter... You have that same dilemma too, right?
I needed something to keep them in that was portable, so if I was hand sewing or beading at my work table I could just place them there with me, and yet keep them organized and out of the way when I wasn't using them. So here's what I came up with.


A vast improvement from what I started with.


I know... Crazy!, right?

I started with my scissor assortment, laying out the various sizes. My sewing scissors were the longest. The scrapbooking scissors are shorter, but thicker. 


I made sure the box I selected was taller than my longest pair.


Then decided on the size of the hold that needed, so I measured them at the base of the handle. Then measured out a piece of paper the size of the box.


I drew out a grid of one inch squares on the template, cut paper scraps roughly the size of the holes and placed them on the template to decide on the placement of the holes.


After cutting the holes in the template I used it to transfer the placement to the box itself, and using a craft knife I cut the holes.

As I cut the holes I decided I wanted to reinforce it, so I used my template to cut a piece of corrugated plastic that I had the same size as the box. (That stuff's great for purse bottoms too. Collect them after the election, they're abundant and best of all, FREE!)


I cut the corrugated plastic large enough that it fit snugly inside the box, then cut the holes in it using the craft knife.
                   
I tested the caddy before I started covering it just to make sure it would work as I had envisioned, (not all of my bright ideas do!).


I selected the fabric that I wanted to cover it with, measured it out big enough to cover the top and sides. I sewed a zigzag stitch around the edge, then turned it up sewed in a casing.

 I used a thin cord that had as a draw string, put the box in it and pulled it tight to gather the fabric up around what would be the bottom of the caddy.
                                           

Now, how to get the holes in the fabric? I couldn't just simply cut the fabric. I considered doing that and using some Stop Fray on it to prevent unraveling, but decided a better solution would be to sew a button hole at each spot. To do that, I placed the template on the top of the box with the fabric in place and hand sewed an X at each spot with contrasting thread.


Once the buttonholes were in and clipped. I permanently tied off the draw string on the bottom. I removed the contrasting thread X's, what I could anyway, you can see small pieces of it were left behind. I probably should have used all white, as the remnants of wouldn't be so noticeable.

 I also added some scalloped ribbon trim to dress it up. (I just whip stitched it in place.)  It holds all of my scissors, craft tools and even my magnifying glass.
 I can just move the whole thing to my work table so if I'm beading or whatever I'm working on I have whatever tool I need at my finger tips without searching around or digging through a pile. 

It freed up space on my little tray. So I could better organize it too. I had this cute vintage green container that held the monster buttonhole attachment to my Grandmother's old Singer. I decided it was the perfect little storage container  for my sewing room. I removed the attachment that it held and filled it with marking pens, awl, screw driver, my measuring stick and other implements of construction. 


What organizing problems have you tackled? I'd love to hear your ideas and solutions.

Thanks for stopping by! :) 

Linking up at Debbie-Doos and other fun parties listed on my Link Party page. Come by and join in!

Sunday, September 16, 2012

Life Magazine - Time Machine

I love looking at old magazines. They are a fun step back in time. And while the articles can be fun to read, for me anyway, it's the ads that really tell the tale.
We went to an estate auction recently and one of the boxes of crap treasures we came home with had a 1954 Life Magazine in it. I'm going to reap a few blog posts from it, as it's a great issue all about fashion, but I'm going to start with one about the ads.
 Get a load at that price! $2.95 for the set. Do you know what complete sets of those Anchorglass Mixing Bowls sell for today? Ones in good condition bring over $100.00.. that's some appreciation rate!
 I love how the two women in this Briggs and Statton lawn mower ad are both mowing the grass in skirts. 

 What a fancy dress for admiring the new window air conditioner!


These just made me giggle. From the lady in the flamenco dancer dress who's constipation worries are over, the innovative step stool that lets housewives "work relaxed", and the woman who dreamed she flew a kite in her new Maidenform bra!

 Here's two more things we can all be thankful for. The invention of a better toilet bowl brush and the 10 key calculator!


Do you eat open face hot dogs with a knife and fork? I guess you'd have to! And how fun is this Libby's Pineapple juice ad?
 Never forget... if you want to win the boys, stay sweet as you are! And of course that starts with Listerine mouth wash! heheh
      
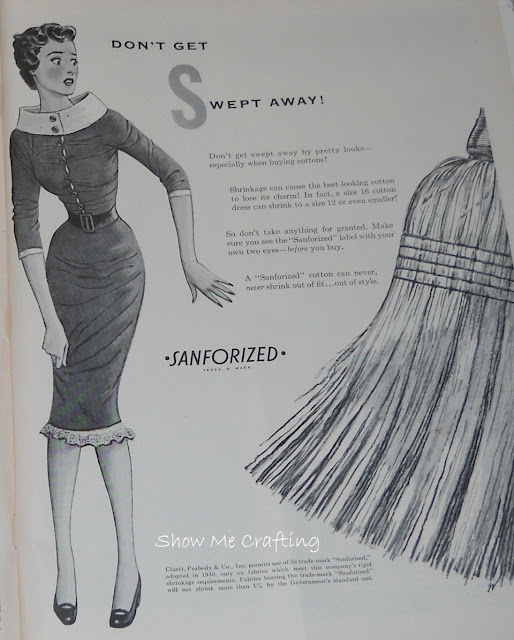
 I guess some things were lost in translation over the years. I'm not really sure how shrinking cotton causes you to be "swept away".. and besides.. when your waist is as small as your neck do you really need to worry about your clothes shrinking?

The "48 states" caught my attention. It wasn't for another five years after this magazine issue that Alaska and Hawaii joined the union and we became 50 states. 
 Due to my watch fetish I had to pay homage to this old Timex ad. I just don't know why the pups look so sad. They're advertising watches! What's there to be sad about?
And I guess after an evening of watching the little woman hang the wallpaper, she could go to the kitchen
where she could sit on her step stool and relax while she cooked dinner using her "pride and joy" Wear-Ever pots and pans! 

Thanks for stepping back in time with me. I hope you enjoyed the ride as much as I did. 

Have a great week :)

I'll be joining DebbieDoos and other fun parties this week, check out my Link Parties page for the complete list.

Monday, July 30, 2012

A New Bag - Because I have expensive taste!

I made a new bag a few weeks ago. As it turned out, I think it's more of a fall/winter bag, so I probably won't carry it for a few more months. I was inspired by one I saw on the web that retails for over $1,000. Who would pay that for a bag? Here's my version.

I made it using fabrics that I picked up at thrift stores, and I'm rather pleased with how the pretty paisley lining peaks out along the edge.
Here's my inspiration. It's the Joplin bag by Thakoon. I've never heard of that maker, I just liked the look of the bag when I saw a picture of it and then was really shocked when I saw the price.
I buy purse handles at JoAnns when they have sales and had this chunky chain handle in my stash. 
I really love the way the lining fabric looks. It doesn't photograph very well, but it's a really pretty paisley of browns and coppery metalics.
The handle clips on with oversized lobster claw clasps, so I can take it off too and carry it as a clutch.
I think I might make a second one from a more summery fabric. I could use the same handle and just switch it from one to the other. It might be cute with bright floral, or maybe with some of that Amy Butler fabric that I won.... hmmm, the sewing to-do list just never really gets any shorter, does it? Does yours?

Thanks for stopping by!

Tuesday, July 3, 2012

Sewing Machine Cover


I've been meaning to make a sewing machine cover for some time now. When I won the Amy Butler fabric from Flamingo Toes I considered making one with some of that, but before I made my final decision I went through my fabric stash and rediscovered this really cool retro apron. I should have taken a picture of it when I started so you could see the "before". It was in really bad disrepair. There was a hole in one corner and the tie was ripped. I could just never bring myself to toss it because it was just so darn cute despite it's poor condition.


I always thought I might find a project for it that wouldn't stress it too much. I tossed it in a lingerie net bag and washed it on gentle and was super careful ironing it once it was dry. I had to piece the back section with the ironing woman fending off her man with the steaming iron. I cut the phrase in a separate piece and made a pocket with it. 

Plain white cotton for the sides, top and back. And now I have another reason to smile when I walk into my sewing room!

Maybe I'll tackle the ironing board cover next!


Have you made a cover for your sewing machine?


I'm joining DebbieDoo's and Fox Hollow Cottage Pin the Tail on the Bloggy. You should join us for the fun!


Debbiedoo's